Showing posts with label TR IDEAS. Show all posts

Tuesday, July 14, 2020

My Herbs of 2020


I keep trying to grow herbs. I have them indoors, outdoors, at the lake, in the city and even at work in the Personal Care Home. I love how beautiful and fragrant they are and, potentially, how useful as an ingredient when cooking.  I believe that many herbs have great healing properties and can be very nutritious and good for you, but that is not something I have ever studied. I do know that the act of growing and nurturing the plants is fun and also good for you.  It gives me joy just to play in the soil, handle the plants, look at the lovely flowers and leaves and smell all the different fragrances!

I really would love to have many kinds of herbs growing in the ground and coming back year after year, but I only have a couple. The light is not great or the area doggie free in most of my spaces, so I like to make good use of container planting. This year I have a couple of pots growing on my patio at home and they are so lovely and fragrant! Two of my coworkers are growing indoor herbs at work as a program with the seniors, so it is one of my big topics of the summer. I have herbs everywhere!


The pot below is my mixed one. It has some sage, sweet marjoram, and new to me,  two kinds of licorice plants.  I have seen and tasted wild licorice a few times but I have never grown any.


The next picture is a pot full of different kinds of basil. I had excellent success with basil two years ago so, this time, I thought I would get creative. This pot has Italian Large Leave Basil shown at the front. That is what I have grown before, and it was easy to grow and yummy. The one with the purple flowers is called Cinnamon Basil, and the one with the white flowers is called Spicy Globe Basil. It was flowering when we got it. It would probably do best if we trimmed off the flowers and encouraged leaf growth, but I am just loving the look of it and haven't talked myself into pruning it yet.


The most successful herb for us has been a mint patch that has been located outside our back door for over a decade. At one point, it got really huge, but with time, it has shrunk down and gotten spindly. Trees have grown much taller around it reducing the light and I am sure the soil got depleted. It has been banged around with its location beside the door and even abused a little by our dog who is very fond of sniffing it. This year we cleaned up that area by that side of the house and added sod but we still left a little square for the mint. We worked in some compost and it seems to have perked up to a reasonable size for our use, and big enough to share slips with a few friends. I warn everyone that it can spread like crazy, and you should put a collar or barrier into the ground around it in order to keep it where you want it and out of the rest of your yard.


We keep trying out different herbs at the cottage and we have real issues with rodents and birds eating them and some that we have put in the ground simple have not overwintered well.  I usually have a pot of parsley inside on the window by the kitchen sink and make good use of it and our little raised bed garden has a big patch of chives growing. I love how gorgeous the chives look with their pretty purple flowers and how they provide us with a great ingredient for cooking and salads all summer long. They also act as a good companion plant by acting as a deterrent and keep away some bugs and critters from the raised beds.


I really like telling jokes so here are a few for you.
 ..Not necessarily hilarious ones, but it is still all part of the fun!

A girl told me that she recognized me from the local vegetarian club, but I’d never met herbivore.
I’ve got a device to fetch futuristic herbs. It’s a thyme machine.

I saw a new book about cooking with herbs. It’s about Thyme.
I was going to send back my fish in a herb sauce at a restaurant the other night, but I wasn’t sure if it was the thyme or the plaice. (Hint: Plaice is a kind of flatfish)
I know someone who was habitually late until his doctor recommended sleeping in a herb garden. Sounds odd, I know, but now he wakes up on Thyme.
I used to work with a very wise herb gardener. He was well known for his sage advice.
Thought I’d purchase a tall herb plant but actually turned out to be tiny. No big dill 

I like to put coriander on my blended tomatoes. It’s "soup herb".

I went to a restaurant the other night and asked for something herby. They gave me an old Volkswagen Beetle with no driver.
😀

Friday, June 12, 2020

My Cute Rock Garden

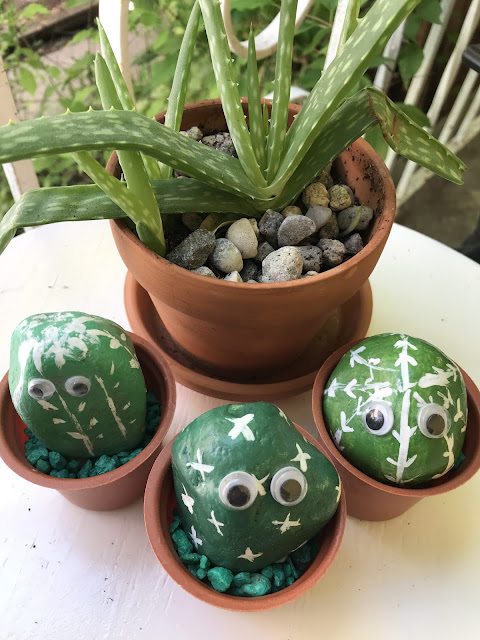
I want to introduce my little plant friends. Curly, Larry and Moe. They don't care if I water them or not, how good the light is or if the temperature drops below freezing!  We have had very inconsistent weather around here, and last night, we had a couple little, late-planted sprouts freeze to death. It can get kind of discouraging. I thought it would be fun to share this little project today.  That real Aloe plant was safely in my bedroom window last night and just went outside to photobomb the little guys.

The pots I used were just cheap plastic mini pots that we had kicking around in my garage, but it would have been really nice with those tiny terracotta pots that are available at the dollar store. 
  •  3 pots
  • 3 rocks that can fit in each pot snugly
  • 3 shades of green acrylic paint 
  • white acrylic paint
  • average size paintbrush
  • fine tip paintbrush 
  • filler for the bottom. I used white play clay from a dollar store.
  • sand or small stones or aquarium gravel 
  • Googly eyes
  • craft glue
  •  mod podge (optional)

I washed and dried the rocks carefully. Next, I set them up on some newspapers and gave them a coat pf green paint with the bigger brush. It was good with just one coat. I went over the rocks once they base coat dried with the white acrylic paint to create different styles of marks with the small brush. My intention was to suggest they were assorted types of cactus.  When they were fully dry. I attached their eyes and promptly started laughing at them because I thought they were so cute. In a while, I decided that they really did need a glossy finish. I was a bit sloppy and wished later that I had been more careful beside the eyes because I required some very gentle clean up on the plastic eyes.  

I tried to just balance them in the pots initially and decided they needed a little more secure of a resting spot. I added a bit of play clay in the bottom to stabilize them and raise them up a little higher in their pots. The plastic pots have a drainage hole on the bottom so I didn't try sand.  Since I have put stones around my aloe plants I thought these little guys needed a finishing topping of stones as well. I had a small bag of leftover aquarium gravel for that little finishing touch. 

This project would be appropriate for all ages and skills. You can get a lot more detailed painting each cactus if you are up for a challenge or just leave them a  solid colour for an extra easy craft.  Bigger rocks in bigger pots would be a fun accent to an outdoor garden, but you would want to seal them with something more weather resistant than craft strength mod podge.
 
I might use these as a craft program at the personal care home some time. Wouldn't they make cute centrepieces for a Western event or a Cinco De Mayo party?


Cute as can be Curly


Meet Moe


Lovely Larry


The Whole Gang.


Wednesday, May 13, 2020

Cheerio Squares and Saving the Bees


My daughter, Emily, has been making this delicious little treat lately. We just love her No-bake Peanut Butter Cheerio Squares! (see the recipe at the bottom of this post)

 It all started with buying a box of Honey Nut Cheerios. Frankly, the big draw was that the packaging offered a free hat or free shirt, and they are offering free wildflower seeds to help save the bees. I am not an affiliate or anything like that. I am just a bit of a sucker for giveaways.

We have received our free seeds already and are waiting for our free hat. I do want to caution that even native plants should be used appropriately in the correct habitat. A plant that does well and is a normal part of our environment here in Winnipeg could turn into an invading plant species in another location. We intend to plant our wildflower seeds in a planter or plant pot and keep them more contained in our yard and do not plan to spread them out in the wild like by our cottage by the lake.

We really do care about the pollinators of our world. Bees, butterflies and other insects are needed to keep our agriculture businesses healthy and food on the table. 

I have done a very successful Recreation Program about honey and bees for work at the nursing home, and I think it is time to do it again. Talking about bees and insects is great for discussion and reminiscence. I will have to be careful not to do any projects that actually attract any bees to our patio area and too close to our residents. Still, we certainly can learn about bees and honey and what we can do to help. During May, I am doing programming focusing on butterflies. They are also a pollinator but can't sting anyone!

According to the Honey Bee Conservancy, there are 10 things we can do to help promote healthy bees for the future.

  1. Plant a garden for bees. This doesn't mean you have to buy a lot of extra plants but rather consider purchasing plants that support bees and other pollinators. I know one secret. Those are often the most attractive and fragrant flowers, which will make your garden or window box look beautiful.
  2. Go chemical-free. Look into an organic or natural way to take care of your plants.
  3. Become a Citizen Scientist. Help collect data and information that can be shared to get a fuller picture of our world.
  4. Provide trees. They provide nectar with the flowers and habitat for them too.
  5. Provide a bee and butterfly bath. That is basically a shallow dish of water with rocks in it for the insects to have a drink.
  6. Build homes for native bees. That could be providing undisturbed spaces or little bee homes filled with small tubes to be homes for certain types of bees.
  7. Give bees homes. You can learn about having your own hive or supporting other community organizations in beekeeping or preserving natural spaces for insect life.
  8.  Inspire the next generation. We can help teach children how to be good stewards of our world in the future. 
  9. Host fundraisers to support organizations that bring awareness
  10. Support local beekeepers and organization. Try buying local honey and wax products. I love getting local honey at my favourite farmers market, and it is always a welcome gift for friends.
                                           

Here are a couple little extra resources that I intend to use at work when we make our No-bake Peanut Butter Cheerio Squares!

Want to sing a song?

The History of Cheerios


And Finally, the Recipe!

No-Bake Peanut Butter Cheerio Squares

Ingredients:
  • 3/4 cup Peanut Butter
  • 1/2 cup Honey
  • 3 cups Cheerios
  • 1/3 cup chocolate chips (Optional) 
Method:
  1. line an 8 x 8 baking pan with parchment and parchment paper or foil 
  2. place the peanut butter and honey in a large pot on the stove or in a larger microwave save bowl.
  3. heat while frequently stirring until they are melted and thoroughly combined 
  4. remove from heat and then stir in the cheerios and, if desired, the chocolate chips.
  5. pour into your parchment or foil-lined pan.
  6. chill in the fridge for an hour or longer 
  7. cut into squares using a sharp knife. 

Notes:
If you want a different look and a chocolatey taste, an alternative is to melt the chocolate chips in the microwave and spread them on top of the chilled mixture like you would frosting. Let it set before cutting.


#savethebees
#beethesolution

Wednesday, April 29, 2020

Making Sourdougn Bread is Easy?

My daughter Emily and I began a couple of sourdough starters yesterday. I have used sourdough in the past, and Elizabeth, our eldest daughter, has kept her own starter alive for almost two years now. I'm already dreaming about all the wonderful things we can try baking in the next tew weeks.

I looked up Sourdough on Wikipedia, just in case you are not sure what makes it special.

Sourdough bread is made by the fermentation of dough using naturally occurring lactobacilli and yeasts. Sourdough Bread has a more sour taste and better inherent keeping qualities than bread made with baker's yeast, due to the lactic acid produced by lactobacilli.

Sourdough seems like the COVID 19 project of the month according to social media, so we decided to join in too. Emily wanted to try the "Wild Method" to make a starter. That means you use flour of some sort and add water and wait to see if wild yeast that is naturally occurring on the flour or maybe even in the air can start to grow. That is how you develop a local sourdough kind of like San Francisco sourdough because of the specific wild yeasts and lactobacilli in that environment. I wanted to go with the lazy method of adding a package of yeast, so I knew how much was in there and can expect faster results.  We are trying both ways.

My first sourdough ever began with a starter gifted to me around 1981 when I was a new mommy and all into healthy foods for baby and family. My starter came with the name Herman. There have been a few more Hermans since then who met unfortunate ends, but I am more than ready to try again with "Herman the 5th". I asked my daughters what they wanted to name their starters, but they seem to think that naming them is unnecessary and perhaps a touch odd.  Oh well.

There are tons of different Pinterest links on how to do sourdough starters, so you can easily find directions that will work for you, but the following is what we did for Day 1.

We carefully cleaned our glass containers.  It needs to be a container that is made of glass, ceramic or plastic. A lid is a good idea, but if not, you will need something like plastic wrap or waxed fabric to cover it over with.

Emily placed about a cup of warm water and a cup of regular flour in her jar and then put it in a warm spot covered loosely.

My jar was bigger than Emily's, so I doubled it up and used 2 cups of lukewarm water and added one packet of quick rise yeast that I had stored in my freezer. I let that sit and soften for about 10 minutes then gradually added ½ cup whole wheat flour and 1 ½ cups of all-purpose flour. I stirred this around until it was kind of thick like a pancake batter. Cover the jar tightly and put my "Herman" starter on the counter next to the "Wild One."

Tomorrow, Day 2, calls for us to remove half of our starter mix and dispose of it. We will then add half of the original amount of flour and water. I will then add a cup of flour and a cup of lukewarm water, mix thoroughly and cover and put it back on the counter until Day 3!

I will keep you updated on our progress.


Have you ever had a sourdough starter?

How about Bread Baking? Is baking bread a skill you have mastered or maybe you have fond memories of your grandma baking a loaf for dinner?


Sunday, April 26, 2020

Here Comes the Sun


The warmth of the past couple of weeks has caused the snow to melt here in Winnipeg. The grass is getting greener and there are birds returning and bunnies hopping all over the place. Spring has finally reached Manitoba!

The sun is peeking out intermittently today and my daughter decided that she would take a break from her work and take the dog out to play in our backyard. She said getting dressed, putting on her shoes and leaving the house to get some sun made her feel happier and a lot more ready to get to focus on work again. I teased her when she came back in by playing  Here Comes the Sun by The Beetles.

I love that song. To me, it says to hang on, it has been a long difficult period but that this too shall pass.

The first online handle I had was the nickname  Rainy Gal because it seemed like every time I went camping it rained. I first got dial-up internet around 1998. Things were very innocent back then and I became part of an online "web design and shared learning group" where we linked webpages in our private websites to form a "mouse village".  Yes, really a bunch of adults. There were people there with varied knowledge and info and I learned about initial set up of pages, graphic design, animation, and HTML and even learned some javascript skills.

Together we designed graphics and animations and had our mice do little activities like telling stories and creating new digital furniture and clothes for them and had them do magic tricks. They even got to go camping. We had little digital prizes and certificates for our mice and our fellow creators. We really learned a lot from and about each other.

One of the big online things back then was to program webpages to automatically open with little music clips. This was all before YouTube existed. I had about 20 mousey pages all with different rain or cloud themed songs that I coordinated with the graphics and page content.  One of my favourite pages had the song Here Comes the Sun playing and I placed a sun animation and added my little mice family creations, all animated to jump up and down in the sunshine.

 It was a happy time.

Perhaps this fairly recent Abby Road release will get this hopeful song stuck in your head.


Here comes the Sun
Here comes the sun, here comes the sun
And I say it's all right

Little darling, it's been a long cold lonely winter
Little darling, it feels like years since it's been here

Here comes the sun, here comes the sun
And I say it's all right

Little darling, the smiles returning to the faces
Little darling, it seems like years since it's been here

Here comes the sun,
Here comes the sun

And I say it's all right

Sun, sun, sun, here it comes

Related Posts Plugin for WordPress, Blogger...