Showing posts with label Art. Show all posts

Sunday, May 17, 2026

Taking Time to be Creative

 Finding My Way Through Structure. Writing, Watercolour, and Creative Rhythm

Art supplies on a table

Over the past while, I spent time working through a 40 day Instagram challenge and also a personal watercolour journal project. I gave me a bit of a seasonal framework—something to guide focus, creativity, and daily reflection.


What surprised me most was how much I benefited from having structure.


The instagram challenge gave me a simple daily prompt. The watercolour journal gave me 40 small, approachable painting ideas and tutorials. Nothing complicated. Nothing overwhelming. Just a gentle direction to follow.


And that made all the difference.


Instead of trying to decide what to create each day, I could focus on how I wanted to create in the moment. That small shift removed a lot of pressure and decision fatigue. It allowed me to simply begin.


Some days the process felt effortless. Other days it took more intention to sit down and follow through. But either way, I kept going. Not perfectly, but steadily.


What I noticed most was how calming it became.


The repetition of small creative actions helped quiet my thinking. It made space for reflection without forcing it. I found myself more in the moment paying attention to colour, texture, light, and the small choices I was making in each piece.


There was also a quiet sense of accomplishment in completing something with so many small steps. Forty paintings was intimidating in one way but it doesn’t sound like that great an ask on paper. Experiencing it day by day gave it weight. It became a record of attention and persistence, not just finished artwork.


I also realized something important for myself right now: structure can be supportive, not restrictive.


It can reduce overwhelm. It can make creativity more accessible. It can turn “I don’t know where to start” into “I just begin here.”


As I move forward rebuilding routines and energy, I’m holding onto that lesson. I don’t need everything to be spontaneous or perfectly inspired. Sometimes having a gentle framework is what makes creativity—and life—feel possible.


This experience also feels connected to something bigger I’m exploring again: how small, consistent practices can support wellbeing, focus, and emotional grounding.


Not through pressure. Not through perfection.


But through simple, repeatable moments of choosing to give my attention.


For now, I’m grateful I followed through. I’m grateful I kept it simple. And I’m grateful I gave myself permission to just work within a structure instead of constantly trying to create one from scratch.


It turns out that sometimes the easiest path is the one that already has a few guideposts along the way.

Friday, June 12, 2020

My Cute Rock Garden

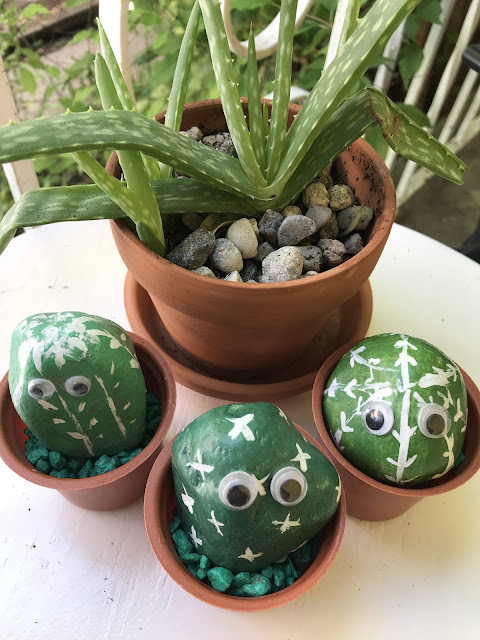
I want to introduce my little plant friends. Curly, Larry and Moe. They don't care if I water them or not, how good the light is or if the temperature drops below freezing!  We have had very inconsistent weather around here, and last night, we had a couple little, late-planted sprouts freeze to death. It can get kind of discouraging. I thought it would be fun to share this little project today.  That real Aloe plant was safely in my bedroom window last night and just went outside to photobomb the little guys.

The pots I used were just cheap plastic mini pots that we had kicking around in my garage, but it would have been really nice with those tiny terracotta pots that are available at the dollar store. 
  •  3 pots
  • 3 rocks that can fit in each pot snugly
  • 3 shades of green acrylic paint 
  • white acrylic paint
  • average size paintbrush
  • fine tip paintbrush 
  • filler for the bottom. I used white play clay from a dollar store.
  • sand or small stones or aquarium gravel 
  • Googly eyes
  • craft glue
  •  mod podge (optional)

I washed and dried the rocks carefully. Next, I set them up on some newspapers and gave them a coat pf green paint with the bigger brush. It was good with just one coat. I went over the rocks once they base coat dried with the white acrylic paint to create different styles of marks with the small brush. My intention was to suggest they were assorted types of cactus.  When they were fully dry. I attached their eyes and promptly started laughing at them because I thought they were so cute. In a while, I decided that they really did need a glossy finish. I was a bit sloppy and wished later that I had been more careful beside the eyes because I required some very gentle clean up on the plastic eyes.  

I tried to just balance them in the pots initially and decided they needed a little more secure of a resting spot. I added a bit of play clay in the bottom to stabilize them and raise them up a little higher in their pots. The plastic pots have a drainage hole on the bottom so I didn't try sand.  Since I have put stones around my aloe plants I thought these little guys needed a finishing topping of stones as well. I had a small bag of leftover aquarium gravel for that little finishing touch. 

This project would be appropriate for all ages and skills. You can get a lot more detailed painting each cactus if you are up for a challenge or just leave them a  solid colour for an extra easy craft.  Bigger rocks in bigger pots would be a fun accent to an outdoor garden, but you would want to seal them with something more weather resistant than craft strength mod podge.
 
I might use these as a craft program at the personal care home some time. Wouldn't they make cute centrepieces for a Western event or a Cinco De Mayo party?


Cute as can be Curly


Meet Moe


Lovely Larry


The Whole Gang.


Sunday, June 7, 2020

Word Web Art During Challenging Times


When I was thinking about what to do for my first Take Good Care of Yourself Sundays post, I was really thinking about tackling a simple habit or skill. This, however, is not being a straightforward time for our world. I know that so many people around me are overwhelmed and shocked and having trouble dealing with everyday life, yet they still need to be productive at work or caring for their families and need to find clean clothes.

Sometimes just a grounding-type of task or activity can be a big help. I purposefully put on a playlist of old songs from my teenage years when I cleaned the bathroom yesterday (NOT a favourite task), and I kept moving until I was done the job. My daughter walks her dog. She feels better when walking or running, and right now, she wants Jasper's company, so the two of them are walking a lot on familiar routes. I have a friend who is knitting up a storm. The repetitive action, along with keeping her hands busy, is something that helps keep her grounded. I like to do art projects and sometimes make music, and I can get into a zone where I lose track of time and forget about all that other stuff going on out there.

What if distractions are not enough for you right now? 

I have had times when the sense of "OVERWHELMED" has been so all-encompassing that it becomes a blur that felt like it was swallowing me, It can reach a point where you lose awareness about what truly is causing the fear and anxiety. One suggestion I have when facing those more extreme responses is to label that fear, that problem, that emotion.

Do you remember doing "word webs" as a writing/ organizing/problem-solving technique when you were in school? It is very similar to brainstorming ideas with a group. You start off with a topic. It could be just one word or a concept, and you write it in the center of your page. From that, you go around the word filling in l whatever randomly comes to mind by word association. Often you can break the word into categories and then those categories into further topics.


I want to suggest a small art project that can be part of supporting your needs. Art skills are not required and materials are flexible and already in your home. 

My example above is about the word HOME.  It was originally going to be about social isolation but my main feeling once I started working on it was gratitude that we had a nice place to be safe and I was with people who I love and care about and who love me back.

Word Web Art

Get a piece of paper, or cardboard, or back of a cereal box, really anything easy to write on. It can be canvas or even a wooden board. It can be coloured if you wish. Make it a size that will be comfortable for you to work on. I really need to work on a table and don't want to physically stress myself, so I am not going to pick working a piece of poster board on the floor, but you could if you wanted to.

Gather your choice of writing implements. Maybe some pens or pencils, markers, crayons, paintbrushes and paints.

Make a border shape on your paper using a pencil. Perhaps trace a bowl to make a circle. You can just draw a rough box shape or an elephant outline. grin.

Somewhere in your shape, you will write a word or phrase that strikes you as important at that moment. It can be a happy thought, sad thought, or strong emotion. Try and make that word quite big and eye-catching. It could be a bright or bold colour, block shape drawing, thicker lines, but make sure it is the dominant thing that will catch your eye. Try not to overthink your choice of word. It is whatever came to your mind. You can always repeat the project with a different word latter.

What other word does the word you wrote make you think about? Fill it in around your original word but make it a little smaller or less eye-catching. Keep going. You can look at more words that your first word suggests to you or find new words coming to mind from the other words you are adding.

Just keep filling in your shape. If your mind starts to wander, just refocus your eyes back on one of your words. You can arrange the words in rows, or they can be upside down, random locations and sizes. There is NO wrong way of doing this. It is expressing what you are feeling, thinking and remembering, and it will always be right for you at that moment.

Lastly, you can add little embellishments or doodles.  If you wish, you can erase your pencil lines or choose to go over it and make it stand out.

➤You might find that it is cathartic and that making your feelings and thoughts concrete might release anxiety or worry.

➤It might give you a sense of priorities you need to focus on.

➤You might find that it brings you a sense of clarity about your values and who you are as a person.

➤There is the possibility that your words will create a call to action in you and it might be the beginning of a plan you will want to embrace.

Wishing you a peaceful and healthy life!


Wednesday, May 13, 2020

Cheerio Squares and Saving the Bees


My daughter, Emily, has been making this delicious little treat lately. We just love her No-bake Peanut Butter Cheerio Squares! (see the recipe at the bottom of this post)

 It all started with buying a box of Honey Nut Cheerios. Frankly, the big draw was that the packaging offered a free hat or free shirt, and they are offering free wildflower seeds to help save the bees. I am not an affiliate or anything like that. I am just a bit of a sucker for giveaways.

We have received our free seeds already and are waiting for our free hat. I do want to caution that even native plants should be used appropriately in the correct habitat. A plant that does well and is a normal part of our environment here in Winnipeg could turn into an invading plant species in another location. We intend to plant our wildflower seeds in a planter or plant pot and keep them more contained in our yard and do not plan to spread them out in the wild like by our cottage by the lake.

We really do care about the pollinators of our world. Bees, butterflies and other insects are needed to keep our agriculture businesses healthy and food on the table. 

I have done a very successful Recreation Program about honey and bees for work at the nursing home, and I think it is time to do it again. Talking about bees and insects is great for discussion and reminiscence. I will have to be careful not to do any projects that actually attract any bees to our patio area and too close to our residents. Still, we certainly can learn about bees and honey and what we can do to help. During May, I am doing programming focusing on butterflies. They are also a pollinator but can't sting anyone!

According to the Honey Bee Conservancy, there are 10 things we can do to help promote healthy bees for the future.

  1. Plant a garden for bees. This doesn't mean you have to buy a lot of extra plants but rather consider purchasing plants that support bees and other pollinators. I know one secret. Those are often the most attractive and fragrant flowers, which will make your garden or window box look beautiful.
  2. Go chemical-free. Look into an organic or natural way to take care of your plants.
  3. Become a Citizen Scientist. Help collect data and information that can be shared to get a fuller picture of our world.
  4. Provide trees. They provide nectar with the flowers and habitat for them too.
  5. Provide a bee and butterfly bath. That is basically a shallow dish of water with rocks in it for the insects to have a drink.
  6. Build homes for native bees. That could be providing undisturbed spaces or little bee homes filled with small tubes to be homes for certain types of bees.
  7. Give bees homes. You can learn about having your own hive or supporting other community organizations in beekeeping or preserving natural spaces for insect life.
  8.  Inspire the next generation. We can help teach children how to be good stewards of our world in the future. 
  9. Host fundraisers to support organizations that bring awareness
  10. Support local beekeepers and organization. Try buying local honey and wax products. I love getting local honey at my favourite farmers market, and it is always a welcome gift for friends.
                                           

Here are a couple little extra resources that I intend to use at work when we make our No-bake Peanut Butter Cheerio Squares!

Want to sing a song?

The History of Cheerios


And Finally, the Recipe!

No-Bake Peanut Butter Cheerio Squares

Ingredients:
  • 3/4 cup Peanut Butter
  • 1/2 cup Honey
  • 3 cups Cheerios
  • 1/3 cup chocolate chips (Optional) 
Method:
  1. line an 8 x 8 baking pan with parchment and parchment paper or foil 
  2. place the peanut butter and honey in a large pot on the stove or in a larger microwave save bowl.
  3. heat while frequently stirring until they are melted and thoroughly combined 
  4. remove from heat and then stir in the cheerios and, if desired, the chocolate chips.
  5. pour into your parchment or foil-lined pan.
  6. chill in the fridge for an hour or longer 
  7. cut into squares using a sharp knife. 

Notes:
If you want a different look and a chocolatey taste, an alternative is to melt the chocolate chips in the microwave and spread them on top of the chilled mixture like you would frosting. Let it set before cutting.


#savethebees
#beethesolution

Friday, April 24, 2020

Update Time


It has been a fairly stressful nine days since I last wrote, but I didn't want to go much longer without an update. I kind of left things with a cliff hanger last time I posted. 

I know there are lots of people facing much worse challenges, and I am trying to just keep calm. I am painting for relaxation, I am doing mindful meditation, trying to keep to a regular routine. I am trying to leave home at home and being positive and happy at work for the residents and then go home and leave my work concerns at work.

My middle (adult) daughter is doing much better now after her respiratory infection, but there were some ups and downs. She had seemed better from last Friday, or so and then she started getting even shorter of breath again and coughing increased. She was sitting at her desk studying when she felt dizzy and passed out, hitting her head and found herself wondering how she wound up on the floor. We immediately called her doctor for an over the phone appointment. Her head wasn't hurt badly, but passing out is never a good sign.

 It looks like she developed a secondary infection. She may have bronchitis or pneumonia, so she was put her on an antibiotic, a different kind of inhaler, and she was given strict instructions to watch that she isn't getting dehydrated and to have frequent small meals. She seemed much better now and is continuing to improve. 

In the middle of all this, I got a call that workplace health and safety were waiving the rest of my 14-day quarantine, so I am back at work. I usually only work 26 hours biweekly, but I will be picking up a couple of extra shifts now.

My daughter that lives in Regina called about 5 days ago... to tell us that she had to take her beloved German Sheppard, Oliver, into the emergency vet clinic. He had to have immediate surgery with a very poor expectation of success. It was touch and go from hour to hour. The operation took more than twice as long as expected, and they removed a section of his colon and straightened out his intestines. He made it through surgery, and the next couple of days was constant slow recovery at home, but he is still not out of the woods. It is just "wait and see" for another day. She is having a little quality time with him cuddling. I wish I was there to cuddle her.

There have been a few other tension creating situations this week. You don't really want to read about how my washing machine leaked all over the floor and has now given up on us, do you?

I went to work yesterday evening for a few hours, and it was not easy, but I know that I am making a difference. It was hard to change gears for work at first, but the problems of my day went away once I focused on being present for my residents and bringing them comfort.
.
I plan to Keep Calm, Wash my Hands and hopefully we will soon find a way to get a new washing machine so I can wash my clothes too.


Sunday, March 31, 2019

What is on Your Spring Bucket List?


Do you make a list of things you want to do each season? How about planning what you want to do during the rest of you life?

 I am often thrilled to get the weeks meals planned but planning special activites for the next few months gives me joy and something to look forward to. It has been a long winter and I am so excited to enjoy warmer weather!


I do love making lists!

 I am always making lists. Groceries lists, "To Do Today" items, things I need to do for work events, things I want to get organized, empowering activities for good mental health, are just part of making everyday life work.   There is also my continual list of  "How I plan to lose weight and get fit," plus keeping track of banking, bills and medical needs.  There is even a need to keep track of family members events such as when we need to go to grandkids school and dance performances.

When I had the brain injury my memory took a significant downward dive and lists were the only thing that kept my mental memory wheel from spinning out of control in an endless loop. When in doubt I tried to remember to check the list. As I recovered and my memory improved, I found that I was busier than ever and therefore had a lot more to remember, so I still needed my lists!
The best lists for me are the ones where I plan out the fun activities or make steps toward goals that make me happy or feel proud of what I am accomplishing. A new season is indeed a fantastic time to think ahead to all you have to look forward to in the coming months.


What is a "Bucket List" anyway?

Yes! This is indeed a topic on the internet!  Basically, the idea is that most of us wish to enjoy meaningful experiences in our lifetimes and the point of a bucket list is to get out there and do it before we die or "kick the bucket." Some people think immediately of exotic destinations they long to see and activities that go with it. Others think of personal accomplishments such as learning a musical instrument or a different language or maybe becoming a public speaker or owning their own business. Others might have dreams of setting up a lasting legacy.. a building that lasts beyond them or setting up a scholarship for deserving students or perhaps ensuring that their grandchildren will have a nest egg to help them have the future that they will someday dream about.
A bucket list can be as big or small as you want it to be and it is flexible. You can add to it or remove items from it - after all, it is about you and your dreams! Your bucket list can help give you some direction and purpose. You can ask yourself what your purpose in life is or you can figure out what all you love in this world. It sets out a unique set of goals that are truly meaningful to you, and once you set that goal, you can start to organize how you might actually realize your dreams.

 You do have to remember that beyond the big goals and important moments are made up of smaller steps and special moments. Don't forget those big goals, but also don't forget to enjoy all the wonderful times and to celebrate the everyday pleasures and experiences.


I am looking forward to a few upcoming special events.


  • In a few weeks, I will attend the Manitoba Girl Guide Conference in Brandon for a weekend.
  • A remarkably large selection of Guiding activities are coming up this Spring in my district. They include everything from an adult award dinner we are planning to youth activities such as hosting a large Mother's Day Tea to a camp, a park clean-up plus so much more!
  • We have our Scandinavian Choir Concert on May 13th.
  • My husband and I are celebrating our 40th Anniversary this July, and we are planning on making it special.
  • I expect to have an opportunity to visit with my oldest daughter who is currently living out of the province.
  • In September I am hosting a week-long gathering of members from an online group I participate in called Christmas to the Max.
  •  We are hoping to get some major work done at our cottage and get a chance to really enjoy it this year!
A lot of my planning is centred around these highlights, but I still need to plan on some just plain
FUN STUFF! Things that make good memories!


Linda's Spring List!

  • Work on Painting watercolour pictures.
  • Create a relaxing corner for me to relax and be creative
  • Make  Easter cards with my new painting skill.
  • Participate in a 30 day watercolour painting challnge.
  • Celebrate Earth Day by starting some seeds.
  • Go to the big garden center to buy the above seeds
  • Buy a new Easter outfit.
  • Bake a special bread for Easter
  • Make some crafts about Butterflies for work and for home.
  • Make some marmalade for the first time in decades.
  • Have a picnic in the park.
  • Go out for a special dinner and a movie.
  • Read a good novel
  • Create paper birds to hang in trees or making lanterns.
  • Make art pieces out of natural items.

I love comments! 

Please tell us about your Spring projects or adventures!


Sunday, February 3, 2019

Art Project::Watercolor And Snow Themed Meetings


Winter is a game changer in Winnipeg. We complain about how cold it is but we feel proud about how we press on with our everyday lives no matter what. It is cold and we adjust, we put on boots, drink hot beverages and plug in our cars so they will start. We embrace it. I wanted to do an art project at work that reflected winter and I decided to to go with Snowflakes.this year. I started by spending two theme-related sessions leading up to the art project.

The first program involved talking about the cold weather we are experiencing and then moved on to reminiscing about what they recall about winter fun and work. I asked about, shovelling snow, going sledding, skating, riding snowmobiles! I heard several people wishing they had taken the time to build snowmen. We talked a bit about global warming and how shorter warmer winters might beof  some benefits and there also might be some problems.

My second snow themed activity involved more individual and small group visits. I looked up a lot of pictures of close-ups of snowflakes on our department laptop. Little videos showing how a snow crystal grows proved to be particularly interesting. We talked about how many arms a flake has and how awesome they are. We speculated if it was true or not that there are no two snowflakes the same. I particularly like using the information and pictures on http://www.snowcrystals.com

For Art Day I wanted to use watercolor techniques which is something we don't do very often. I like tape resist projects and used strips of painters tape over water-color paper. The paint was inexpensive paint dry disk sets. I attached the paper to the table with the tape. It kept the projects from sliding around and at the same time, it gives a nice kind of matting around the art. We used bigger brushes and I encouraged the use of lighter colors to suggest a snowy day but any color was fine.

The only really note worthy change was that I rotated the paper as the session progressed. That made it easier for people who don't have a lot of reach with their arms and to encourage people to cover that whole page with color.

The pictures dried quickly and then we had the fun of pulling off the painters tape to reveal our designs. I like to back art with poster board pieces to show off the work, make it look a little more finished and to make the paper sturdier and lie flatter.

Our Artists were quite thrilled with their final results.

Friday, September 21, 2018

Recycled Burlap & Boxes Make Useful Storage Solutions

This has been a very long summer. I finally got out to the cottage and I really wanted to keep busy but not of the more active projects were a good possibility for keeping me out of trouble. No painting the outside of the cottage? No helping with the new Dock? Sigh.  I do love crafting though and did a few projects with the grandkids one weekend and I began working on crocheting an afghan.

I have a wire rack behind the door of the washroom at the cottage. Storage is at a bit of a premium in there. Every time someone slammed a door the little sample shampoos, and extra lotions and insect repellant slid out of the side and onto the floor. My craft starved brain went wait! We can solve this!

I do like projects made from recycled material.


First, I hate to spend more money than I must and second, I am always working with groups that have few resources, so I am always stretching to find cheap, or better yet, free projects! I always look to find projects that are good looking and if possible useful.  My little question when deciding about projects for Girl Guides/ Scouts was always would the family keep this around for a couple months or does it go straight in the garbage. I also wondered "how much stuff can one family attach to a fridge?"
I thought I would try for a solution to my Washroom door slaming problem, make a way to sort out some arts and craft supplies since I was feeling particularly crafty and make a vase for extra points.

This container project is something that was common years ago with youth groups and thrifty homemakers!  It has a bit of a vintage feel but that tends to be how a lot of recycled material projects start off. Vintage is fun. What makes it more current are the colour choices and details that you choose.
It is very flexible for materials.  I was thinking of Fall at the cottage. right now, so that influenced my colour and texture choices. I am also thinking about the various places my new box containers, my new vase and my new art supplies holders are going to be displayed.

I literally dug through the weekends recycling and came up with some cans from soup and spaghetti sauce and some crackers boxes. We had some twine in the storage room and a bit of white craft glue and some extra tacky glue.  I also had a $3 roll of burlap out here because I was planning on making table decorations for a family Fall dinner or perhaps Thanksgiving dinner at the lake. There was plenty to spare.

First, I tested out my various sized boxes to find one that would fit properly on in the shelves and then I cut the height to the correct size for my location. By this point, I was all excited and planned out what to do with even more of my garbage! grin This is such a flexible project!

I was thinking about putting on a base layer of acrylic paint on my future container. I wanted to add paint to the boxes in particular to kind of seal the paper in case a little soap or lotion came off in the container  Regular acrylic paint  is not the greatest when sticking on aluminum cans so my husband Bob said he had an almost empty bottle of black spray paint and offered to just take the items outside and give them all a coat of paint on their inside and the outside. Yes!

Once the boxes were cut to size I moved on to the cans.

First, I took a metal file to the cut edges just to make sure there were no sharp edges and that nothing would catch.


Next, we got everything painted. The colour peeks out a bit from behind the twine or burlap so it is not the prominent colour you are seeing. I am in a fall mood, we have a lot of black in our cottage, and we had that left-over paint, so my colour choice was simple.  It would be fine in whatever colour you wanted to use. In the summer I would probably go with white or yellow or blue for the cottage!
Once it was dry from being painted I put a bit of tacky glue down the side of the box or the can and just wrapped it around and carefully overlapped the end where it joined up and then I used a bit of extra glue there to secure it.  That simple.

 I did line up the finished bottom edge of the burlap strip on the bottom edge of the container and I folded the excess at the top of my containers to the inside and used a lot of glue for that. I liked the look of it wrapping over on the box top edge and the height of my box worked with the width of the burlap but if the box was taller I would not have worried about wrapping it over the edge
.
To keep everything in place while it dried I used clothespins. - yes, I use clothespins out here. In fact, that is one of the things that are kept on that bathroom shelf.  Binder clips and the big paper clip would have been useful too if I was at home in my office.  I suggest wiggling your clips loose before it is totally dry. The glue is soaking through the fabric and holes and will attach to your clip to your box or can!


The twine wrapping project is just as easy.
I would suggest using a softer twine since some types can be quite harsh and hard on your hands. The one we had in our storage room was perfect.


Prep your containers the same way and then add a bit of glue at the starting point start (I started at the bottom) and begin wrapping, around and around and around. Add the glue on to the container as you go and try and have the glue run all the way up. It is okay if it isn't all glued down so I used just a line along the side seam of the tin can and just pushed it in place as I looped it around the rest of the can. The finishing off can be a little tricky. Try and fray the cut edge a bit so that it is a bit flatter and tuck it under the edge of the previous row. It is not cheating to use a hair dryer to speed up drying in heavy glue areas. 

I wanted to add some extra embellishments to my containers, so I tied some twine around it. There are so many things you could add like lace, ribbon or fake flowers or leaves to the side to make it extra cute.


Give this project a try!


Make it your own.  I would love it if you let me know if you try this project at home for your self, with your youth group or your seniors!


EXTRA   HINTS

• This project is simple to do, if somewhat sticky with the glue. Consider
precutting the boxes and the burlap to the right size before doing it with your group. Give a variety of embellishments to your participants so everyone has a unique finished product. The repetitive nature of wrapping the twine
around might be very calming for some individuals. This would be challenging for people with limited use of a hand. I wonder how well double stick tape would work for getting everything in place.


• Yarn around the jars, cans or boxes does work but be aware that most kinds of yarn stretch a bit when wet. They also shrink down again as they dry. The motto of the story is to take it easy on the glue and if it is getting soggy don’t try and pull it  too tight.


• Consider this project for Earth Day!
Related Posts Plugin for WordPress, Blogger...